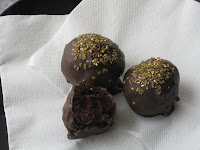
I have always held a fondness for Devil Dogs, however. Something about that dense, almost dry cake combined with the light fluffy creme in the middle; it was the combination of textures that really did it, even more than the flavors themselves. I've been bound and determined to try to make 'em myself one day.
And this... well actually this was a great big fail. First I used the wrong chocolate cake recipe, and then the stupid cake layers refused to come out of the pans; they crashed & burned like Axl Rose backstage after a reunion tour concert, but with less wheezing.
And yet if 1980's television taught us anything, it's that you take the good, you take the bad, you take them both and there you have the facts of life.
The facts of life.
There's a time you've got to go and show you're growing now you know about how to salvage a baking semi-disaster. Thanks to Bakerella what we're doing here is salvaging.
 |
| Chocolate melts in a bowl, on a candle warmer |
Then you make your filling, which is related to a standard buttercream frosting and, just like standard buttercream frosting, really easy to make. Honestly, you should always make your own vanilla or chocolate frosting, because it's so easy and there's no partially hydrogenated cottonseed oil or sodium acid pyrophosphate. In this case we're mixing it with marshmallow fluff, which has the added bonus of turning into fluffernutter sammiches when you're done.
Ingredients
-Cake-
1 cup unsweetened cocoa (the powder kind), preferably dark or Dutch process
2 cups boiling water
1 cup (2 sticks) butter, room temp
2 cups sugar
 |
| See how good this cake looks? It's totally faking it. |
2 3/4 cups flour
1 teaspoon baking soda
1 teaspoon baking powder
1/2 teaspoon salt
-Filling-
3/4 stick of butter butter, room temp
1 1/2 cups powdered sugar
3/4 cups marshmallow fluff
1/4 cup of heavy whipping cream
-Dippins-
Candy melts, candy bark, chocolate melts. These are preferable to chocolate chips, since they were made to melt and then harden almost immediately, whereas chocolate chips won't really harden for you.
-The cake
1) Grease & flour your two round cake pans & put them in the fridge.*
2) Preheat your oven to 350 degrees.
3) In a medium sized bowl, combine 2 cups of very hot water with the cocoa powder, stirring until blended. Put this in the fridge or freezer (preferably the freezer) to cool.
4) Beat the butter with a mixer until creamy, then add sugar and keep on beating it until it looks like mashed potatoes.
5) Add eggs one at a time, beating well after each egg.
6) In a separate bowl, combine remaining dry cake ingredients. Use a whisk or a fork to fluff them together.
7) Slowly add your "dries" into your sugar/butter mix, alternating with cooled-off-hot-cocoa that you pulled out of your freezer. A little flour, a little cocoa, a little flour, a little cocoa. Keep blending on low the whole time.
8) Now take your cake pans out of the refrigerator and load them up.
9) Bake at 350 for approximately 25-30 minutes. Cakes are done when a toothpick inserted in the middle comes out moistened or with a couple crumbs, but not brown with chocolate batter.
-The filling
10) Using a mixer, beat together the butter, powdered sugar, and marshmallow fluff.
 11) Slowly mix in the heavy whipping cream and keep mixing until you get a light & fluffy consistency. I was making a double recipe, and ended up using about a third of the pint of cream.
Now, I'm not going to tell you how to make the cake balls. Frankly, it seems insulting to Bakerella. This is all she does, and she does it so well, and she's famous for it.... I don't know, I just can't steal her thunder. Especially since her desserts are SO beautifully made, and mine belong on the Island of Misfit Baked Goods. So here's the link to the actual crumbling & dipping & decorating part.
Mine still taste good, mind you. Makes a nice little treat to bring to the in-laws.
*Pro-tip: This is where I failed. Generously grease & flour the pans & leave them in the fridge until you're ready to load them with cake batter.


No comments:
Post a Comment