Tuesday, November 27, 2012

Kid-friendly Pizza Bites

Today I faced the usual conundrum of what to have for lunch. Hungry & grumpy, I went for the ol' standby. Cause who doesn't love pizza?  And mini pizzas are such happy little finger foods. Like happy little trees. Only edible. And not green. Unless you want them to be green.

Don't you want me baby! Don't you want me, oooooh!
This recipe is super easy, and I can't help but think that kids would love to make it.  This is all you need:
And then of course whatever toppings you want to put on 'em. A jar of Prego & some shredded mozzarella...  Frank's Red Hot sauce and shredded chicken... Refried beans, salsa, and cheddar, why not?  Heck, today I even made a few with my bacon horseradish dip.  Because I could.

For one dozen pizza bites, you just need an egg, 1/3c of milk, 1/2c of flour, a big pinch of salt, and a muffin tin.  Mix it up in a bowl and add whatever other spices you want (pictured up there is black pepper, basil, & oregano ).

Spray the muffin tin with non-stick spray and use a regular household tablespoon to load up the cups.


 Bake it for about 20 minutes until the batter has risen and is a little bit brown & crispy around the edges. I like to bake it until it doesn't look wet anymore.

← Good enough.


Then put on your toppings. Today I did some with spaghetti sauce & cheddar, some spaghetti sauce & bleu cheese, some combo, all with onions, and a few bacon horseradish. I mean, why not, y'know?  Have fun with it.

Then bake it for another 20 minutes or so, and voila. Lunch. Dinner. Snacktime. Whatever you want, the sky is the limit. And just so's you knows, if you double the recipe, it makes the perfect amount of batter to fit on a pizza stone. Just keep it at 1 egg. Double everything else.

Ingredients

1 cup of flour
1/3 cup of milk
1 egg
1/8 teaspoon of salt
Toppings

1) Preheat oven to 350 degrees.
2) Mix first four ingredients in a small/medium bowl. Add seasonings like basil, oregano, shredded cheese, or other spices that will compliment your toppings, as desired.
3) Spray the muffin tin with non-stick spray in each cup.
4) Using a regular household tablespoon, fill each muffin cup. One tablespoon-full in each cup should work out just right.
5) Bake at 350 for 20-25 minutes.
6) Remove from oven and add your toppings. Don't overload these with sauce, by the way; just a teaspoon of spaghetti sauce on each pizza bite is fine.
7) Bake another 15-20 minutes.
7.5) You can remove the pizza bites easily using a fork or tablespoon to tip them out of the tin.

And there you have it. Omnomnom!


Saturday, November 24, 2012

Bacon Horseradish Dip


So maybe you got a work potluck coming up, or maybe you're making sloppy joes for dinner and you need a side dish. Look, sloppy joes are a perfectly adequate dinner. The commercial even says it counts as a vegetable. You can have sloppy joes for dinner if you want. You can even put the sloppy joe mixture on one long french bread loaf and then broil it in the oven with cheddar cheese on top.

(Psst... do it. Do it. Make up your sloppy joe mix and then take a loaf of french or italian bread, slice it lengthwise, spread the entire pot of sloppy joe meat over it, cover with a few slices of cheddar and maybe some bacon if you want, and then broil it until the edges of the bread are toasty and the cheese is melty. It's really good. You're a grownup. You can eat what you want.)

You know what else is good and you can eat it if you want? Bacon horseradish dip. The secret is in the lemon.

(*Note: all good dips require some resting time, and this one is no exception. It's going to have to sit for a few hours in the fridge before you serve it.)

Ingredients

7 or 8 slices of bacon
1/2 package of cream cheese
3/4 of a 16ounce tub of sour cream
2 or 3 tablespoons of mayonnaise
2.5 to 3 ounces of horseradish (basically, 2/3 to 3/4 of the tiny jar you buy at the grocery store)
2 tablespoons of garlic powder
1 tablespoon of onion powder
1 teaspoon lemon extract
salt & pepper to taste

1) Fry up your bacon, transfer to a paper towel, roll it up in the paper towel to absorb grease. It's ok to have curly bacon; we're chopping it up anyway. Set the bacon/paper towel burrito to the side to cool off while you do other important things.
2) With a fork, mash the sour cream & cream cheese together in a small mixing bowl, then mash in the mayo.  Mix well.
3) Add in all remaining ingredients (horseradish, garlic powder, onion powder, lemon, salt/pepper) and mix it up. Don't have to be fancy here, we're just making dip.
4) Chop up the bacon nice and small and mix it into the dip.
5) Let it sit covered in the fridge for at least 3 or 4 hours before you dig in.
Serve with pretzels, rippled potato chips, and/or Notre Dame games.


Monday, November 19, 2012

Froot Loops Cookies

I know I promised to you all that I would never use cake mix. I lied. It was just a little lie. It doesn't really count if I'm using the cake mix to make not-cake, right? I mean, these are just the easiest cookies in the whole world and they're delishus and you have to make them someday. So it's ok if there's a teensy little lie thrown in there.

You'll forgive me when you eat these.


The ingredients are very simple and stuff that you should have on hand. Unless you want to get all fancy up in here. That's cool, cause this recipe is just a blank canvas waiting for fancifying. I made orange & strawberry cookies, and the orange ones tasted like froot loops, the strawberry ones tasted like strawberry ice cream, and the snozzberries tasted like snozzberries.

It all begins with cake mix. Pick a box of something that sounds fun. Like strawberry cake mix!


Add an egg, a package of cream cheese, a stick of butter, 1/2tbsp vanilla extract & a 1/2tbsp of some other extract that matches. Mix it up.

(It smells like strawberry ice cream!)


Roll 'em up into balls, cover 'em with powdered sugar, bake em up, and woo! Done!

This recipe has been around the webs on practically every recipe site out there. And there's so many ways you can change this. Yellow cake with vanilla & almond extract,  chocolate cake with coconut extract, spice cake with rum extract & cinnamon sugar...  I think next time, I'm going to try making a batch of strawberry dough and a batch of orange dough and mixing them together to make half & half cookies. That sounds fun!

Ingredients for Froot Loops variety

1 box of orange cake mix
1 package of cream cheese, softened
1 stick of butter, softened
1 egg
1/2 tablespoon of vanilla extract
1/2 tablespoon of lemon extract
Powdered sugar in a bowl, approximately 1/2-3/4 of a cup

1) Heat oven to 350ยบ
2) Cream butter & cream cheese together.
3) Beat in the egg.
4) Beat in the extracts.
5) Dump in the cake mix & beat it on low until no longer in danger of sending cake powder all over your kitchen, then mix higher & higher until it's all incorporated into a really heavy dough.
6) Roll the dough into balls and roll the balls in the powdered sugar.
7) Drop them on your parchment-paper-lined cookie sheets and don't worry if they're close together, they don't spread out too much.
8) Bake for approximately 10-15 minutes. You want the cookies to be firm to the touch if you poke them a bit with your finger.
9) Immediately remove to your cooling racks. These cool off really fast, so don't hesitate to rip them off the cooling racks and straight into your mouth. Your mouth will thank you.

There you have it, the easiest cookies in the whole world. I wish I had a pretty picture to show you, but it's been really grey and somewhat rainy and we've had no good light, so the pics are coming out meh. Instead, I leave you with a picture of my breakfast:


Toasted whole wheat bagel with baked goat cheese and a drizzle of extra virgin olive oil. SO good, I'm gonna make it again tomorrow. And probably every day until we're out of goat cheese and/or olive oil. Try it with chevre cheese. Delishus!

Wednesday, November 14, 2012

Comfort Food: Spaghetti Sammich

First, let me apologize. I really would like to post new exciting bakings every week, but as many of you know I've been a bit on the ill side. Nothing says "come eat my food!" like "*hack*hack*sneeze*cough*splork*".   Instead, I'm offering to you a mini-post on my current favorite comfort food. Warning: it contains no bacon.

Now, this may come as a shock to you, and please don't burn me at the stake for heresy, but... I don't really like pasta. I've never had a really crappy day at work and thought to myself, "Ohmagawd, what I really want right now is a big bowl of alfredo." And let's face it--pasta on its own really isn't that good. It's only good because of what we do to it. It's like tofu: bland, soft, colorless, and you gotta gussy it up to make it appealing.

My favorite part about spaghetti dinners has, honestly, been the garlic toast. Husband makes the spaghetti, and I put the bread in the toaster and then schmear it up with butter & garlic, all warm and melty and gooey and oooooooooh yeah, that's the good stuff right there.  Have you ever been at the italian restaurant and used your bread to scrape up the last of the sauce? That's where it began. I loved to eat the sauce with my garlic toast; then I started leaving a little bit of spaghetti in my bowl to eat on the toast; and then I had the epiphany: why not just put the spaghetti on the toast completely? It's my dinner, I can eat garlic toast spaghetti if I want to!
And you know what? This is really good. You want to.


-Step 1-
These days I buy hoagie or bolillo rolls at the grocery store and keep them in the freezer until needed for sammiches.  You can take them out of the freezer and pop them right in the toaster oven, frozen, and they'll still toast perfectly fine. (Note: you can use regular bread, and just make the sammich open-faced. Still delicious!)  So for step 1, get out your bread of choice, and put it in the toaster.


-Step 2-
While toasting, make up a small bowl of spaghetti. Use extra sauce, cause no one likes a dry sammich.  Cut up the spaghetti into small pieces. This is the only time it is acceptable to cut up spaghetti for adult consumption!  That's why good italian restaurants give you a tablespoon with your pasta, you philistines!


-Step 3-
When the toast is ready, pull it out and quickly slather on a good heap of butter & garlic powder while it's still warm. I toasted mine a little bit too dark here, but all toast is good toast deep down inside, and it just wants to be loved. That's ok, dark toast. I'll love you. You see those cheese slices, btw? That's real shaved parmesan. You're making food for your soul here, and your soul don't want that green-can stuff that tastes and looks like sawdust!


-Step 4-
Spaghetti on bread, cheese on spaghetti, top with more bread. You can slide a few slices of pepperoni in there if you like, we won't judge you. Microwave for about 30-45 seconds if need be, to melt the cheese.
This is where we end up. This, my friends, this is lovin for your tummin. Keep the fork; you'll need it!

Wednesday, November 7, 2012

Double Chocolate Reese's Pieces Cookies--now with extra crocodile gods!

Good afternoon everyone!   I've been meaning to do a blog post for a few days now, and just haven't gotten to it. No excuses.

Well, some excuses. There was a 3 and a half hour line to get in to the voting machines yesterday, and most of that time was spent outside in windy 40 degree weather (that's 4 degrees for you Canadians).  And then I when I got home I had to make up that work time missed, which meant being on the claims computer until 7:30pm. I was pooped.

Next time I should bring a chair. And two books, because the line outlasted Wintersmith. Speaking of Sir Terry Pratchett, any Discworld fans up in the hizzouse today?

No?

Why in the name of Offler the Crocodile God not???  Seriously, go pick up Wee Free Men.  And while you're at it, get me a copy too, would you? I seem to have lost mine. It's a tragedy.
Losing the book. That's the tragedy.
The book isn't a tragedy.
The book is awesome, but not a tragedy.

What is also not a tragedy are these cookies. (Like that segue? That was clever, wasn't it? Betcha didn't see that coming.)


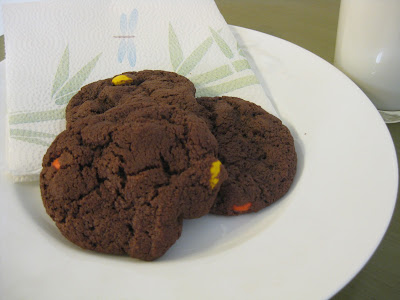
They taste like brownies. With Reese's Pieces. Reese's Pieces brownie cookies with chocolate chips. The batter was edible on its own. You know, if you like brownie batter. Some people prefer brownie batter to cookie dough. Ooooooh yeah, that's the good stuff right there.

Best baking assistant ever!
There's nothing too special about the construction of these cookies.  You cream together your 'wets'.
You whisk together your 'dries'.
You mix the two together, trying not to eat the cookie dough before it goes in the oven.
If it's a good day, you've got your good friends there with you to help you---aw, who'm I kidding, she did half the work! And scrubbed down my kitchen afterwards when my back was turned.


The funny part was the fact that I enthusiastically doubled the recipe, completely oblivious to what my poor Kitchenaid could handle. So note to yourselves: if you double the recipe, you're going to end up kneading the dough by hand in a giant punch bowl. It'll get all over your hands & under your nails & you may have to lick your fingers.
← Giant punch bowl.

Ok, enough chatter.  You want the recipe now. Here's Confession's of a Cookbook Queen's Double Chocolate Reese's Pieces cookies.

Ingredients

2 cups all-purpose flour3/4 cup of unsweetened cocoa powder
1 teaspoon baking soda
1/2 teaspoon salt
-
2 sticks of butter (slightly soft)
2 cups white sugar
2 eggs
2 teaspoons of vanilla
1 cup semisweet chocolate chips
1 cup Reese's Pieces

1) Heat oven to 375
2) In a medium/large bowl, whisk together the first four ingredients until they're about as mixed as you can tell considering it's powder.
3) Cream together your butter & sugar until you get mashed potatoes (that's a small inside joke there).
4) Add your eggs & vanilla to the butter & sugar and keep mixing until it's very well blended.
5) Slowly add the flour mixture to the 'wets' mixture until it's completely blended into cookie dough.
6) Dump in the chocolate chips & Reese's Pieces and mix it up.
7) Drop tablespoon-fuls of dough onto cookie sheets lined with parchment paper. Try to space them out a bit; cookies spread while cooking.
8) Bake for approximately 9 to 10 minutes.
9) Let the cookies rest on the sheet for only a few seconds before removing them to a wire rack to cool.

Here's the final result:
Best when warm, straight out of the oven, with a glass of milk, of course!

Thursday, October 25, 2012

Cinnamon Bun Cupcakes

Today was kind of a crappy day. Not so much because of work; more so because of the cats. 
This cat, in particular
And not so much crappy; more so the other end. That's all we're going to say on the matter. Yes there are pics. No you can't see them. Weirdo.  And when I get stressed out and worked up, and the house is already clean (because I had to mop the kitchen and scrub the dining room and change all my clothes and take another shower) I turn to baking to relax. You probably knew this already.

So today I'm giving you yet another excuse to eat dessert for breakfast. Inspired by Confessions of a Cookbook Queen's Honeybun Cake, I present to you: Cinnamon Bun Cupcakes.

As always we start by creaming together your butter and your sugar. Alton Brown says that what we're doing with this step is using the sugar to create little pockets of air in the butter. Yes, I think of that every time. Every single time I make a cake, "Now we're creating little pockets of air in the fats of the butter."  

As we know, start off with a mostly-room temp stick of butter, not too warm, not too soft, and whip it up with the sugar until it looks like mashed potatoes. That's your gauge. You want mashed potato butter sugar.  My butter here in this picture wasn't quite soft & airy & mashed potatoey, and that's because it was a little bit too cold. On the plus side, I discovered I didn't have any eggs & had to run out to the grocery store, leaving this on the counter to warm up just a teensy bit. Came back with eggs & the butter was just right.

Next you add your eggs. Unless the recipe says otherwise, you always add your eggs one at a time and beat them thoroughly into the cake each time. This is for cakes, mind you, not pancakes or bread or cookies. Cakes go one egg at a time. Egg; mix; egg; mix; vanilla; mix. 

And again, unless the recipe says otherwise, you want to have your "dries" in a separate bowl whisked together. That's all the dry ingredients except for the sugar (cause that's making pockets of air in the butter fats!)--your flour, your baking powder, your salt.

I decided with this recipe to mix the cake together in the same manner as the classic southern 7Up cake. Have you had one of those?  Rich and dense as heck!  I make 'em with Mountain Dew Code Red.  Anyway. You mix your wets (minus the liquid, which in this case is milk), you whisk together your dries in a separate bowl, and then you slowly add the dries into the wets, alternating with the milk. A little flour; a little milk; a little flour; a little more milk; the rest of the flour; the rest of the milk.

Mix it up and you got cake mix.
Mix your brown sugar & cinnamon & vanilla in another bowl and you got filling.

Now we start the fun part!
A layer of cake mix, a tbsp of brown sugar mix, another layer of cake mix. You can take a toothpick and try to swirl it up if you want, like in the original recipe, but it didn't work out so well in the cupcakes so I gave up. Tasted fine. Won't notice the difference.


Left side of the pan: halfway done.
Middle of the pan: unswirled.
Right side of the pan: swirled.


When they come out of the oven, they look like little coffee cakes! So cute! So good-smelley!
Front: swirled. Middle: not swirled. Still tastes the same.
I admit, the original recipe called for glazing these right away, but I've had the experience of glaze melting into hot cake and completely disappearing. So we went out for dinner while these cooled off on a wire rack. Came back, they were completely cooled, so popped the rack over a sheet of newspaper and glazed them. Then sprinkles. Autumn leaf sprinkles.
The finished result was pretty darn good if I don't say so myself.


Recipe time! This recipe gave me 18 good-sized cupcakes.

-Cake-
2 cups of flour
1 tablespoon baking powder
3/4 teaspoon salt
1 and 1/4 cups sugar
1 stick butter
2 eggs
1 teaspoon vanilla
1 cup of milk

-Filling-
1 cup of brown sugar (I prefer dark brown sugar)
1 tablespoon cinnamon
1 teaspoon vanilla

-Glaze-
1 and 1/2 cups powdered sugar
4 tablespoons milk
1 tablespoon vanilla

1) Preheat oven to 350 degrees.
2) Whisk together the first three cake ingredients in a mixing bowl.
3) In another mixing bowl, cream together the sugar and butter.
4) Add eggs one at a time, beating well between each egg.
5) Add vanilla & mix well.
6) Slowly add your flour mixture into the sugar mixture, alternating with the milk, a little at a time, mixing well between each addition.
7) Pop some cupcake baking cups into your muffin pan, and using a spoon or ice cream scoop, add approximately 2 tablespoons of batter to 18 cups.
8) Layer a generous amount of brown sugar mixture on top of the batter; you're going to have some leftover, so don't be stingy.
9) Layer the rest of the batter on top.
10) Bake at 350 for about 25-30 minutes, until golden brown. You know your cake is done when the top is springy to the touch. Let cool on a wire rack.
11) Once the cakes are cooled, whisk up your glaze ingredients in a small bowl.
12) Lay out a piece of newspaper that you don't ever want to see again (the political pages, perhaps?), sit the whole wire rack on top of the page, and then pour your glaze over the cupcakes.  You should have just enough glaze for all 18.
13) You don't need sprinkles, but sprinkles are cool. Like bowties. Only a lot more edible than bowties. This is a perfectly valid 13th step.

And there you go. The brown sugar cinnamoney middle makes it feel breakfasty. I bet this would be really good with a cup of coffee. Hey, grownups can have dessert for breakfast. It's Grownup Privilege.

Sunday, October 21, 2012

Step 1: Caramel Apple Cheesecake Bars

My intent is not to write a famous blog with thousands of subscribers and advertisers and comments that scroll for days and days. This isn't what we're doing here.

What we're doing here, my dears, is baking up something good! You will not find sugar substitute here, nor margarine. No canned frosting, because that stuff is scary. If we're going to break our calorie bank, we're breaking it all the way, my friends.

And we're starting with Caramel Apple Cheesecake Bars, by Closet Cooking! I didn't have or couldn't find all the ingredients, so there were some changes. Also, I've doubled the original recipe here, and baked it in a 9x13 casserole dish; most of it is going to work tomorrow for my boss's birthday, but I wanted to keep some for myself.  (Do you see this? How could you not want to keep it for yourself!)


Before we start, here's a couple of tips:
When you're making bars or brownies, you can line the pan with aluminum foil and put your batter into the lined pan. When it's all cooled, gently lift up on the foil and it should all slide out easily.
And, if you forgot to take out your butter to thaw ahead of time, you can microwave it on full for 8 to 10 seconds, and it'll soften up just fine. One stick of butter for 8 seconds, 2 sticks of butter for 10 seconds, no more than two at a time or it won't soften evenly.

Ingredients:

-Group 1-

2 sticks of butter, room temp
2 cups flour
1/2 cup brown sugar, packed (I always use dark brown sugar, for maximum flavor)
1/4 teaspoon salt
1/2 teaspoon cinnamon

-Group 2-
4 apples
2 tablespoons ordinary white sugar
1/2 teaspoon cinnamon
1/4 teaspoon allspice

-Group 3-
1.5 sticks of butter, soft but still a little chilled from the fridge
1 cup flour
1 cup oats (the kind that comes in tub you used to use as a drum when you were a kid)
1 cup brown sugar, packed
1/2 teaspoon cinnamon

-Group 4-
1/2 cup sugar
2 packages of cream cheese, room temp
2 large eggs
1 teaspoon vanilla

Now let us begin!

-The crust
1) Turn on your oven, and set it to 350 degrees.
2) Combine Group 1 ingredients in a mixing bowl until it resembles sugar cookie or shortbread cookie dough.
3) Press this out into your baking dish (either 2 8x8s or 1 9x13).
4) Bake until light golden brown at 350F, about 12 minutes or so, then set it aside on a wire rack to cool.

-The apples

5) Peel and core and chop up your apples into small pieces.
6) Mix all Group 2 ingredients together in a second mixing bowl.

-The streusel
7) Take the first mixing bowl (which you used for group 1) and roughly mix all Group 3 ingredients together. This should NOT be a smooth mixture.

-The cheesecake 
8) In a 3rd mixing bowl, cream the sugar and cream cheese together until smooth.
9) Beat in eggs, one at a time, mixing well after each egg.
10) Mix in vanilla.

-The construction
11) Retrieve your cooled shortbread base and pour on the cream cheese mixture, covering the whole crust.
12) Slowly drop the apples on top of the cream cheese mix, covering it evenly.
13) Layer on your streusel topping (that's the oatmeal mix); it should cover the apples completely.
14) Bake at 350F about 30-35 minutes, until the cream cheese has set. Let cool completely.

At this point, many people use regular caramel sauce that they bought at the grocery store. Drizzle it over, cut it up, serve it out, and you're done. But if you're feeling adventurous, you can make your own:

-The caramel sauce
3/4 cup of brown sugar
1/3 cup of butter, room temp
2/3 cup of evaporated milk
1 teaspoon vanilla
1 good pinch of coarse salt

Combine all ingredients in a small saucepan over medium heat & bring to a boil. Once it boils, turn down the heat and let it simmer until nice & thick. Try not to stir it too much, as the secret to caramel sauce is letting the sugar and butter melt together.

You want some pictures? We can do pictures!

So to start, I tried mixing the shortbread crust with a wooden spoon, but quickly gave up on that. Yeah, it didn't want to play with the wooden spoon. This worked a lot better just using my hand and folding the mixture over and over into itself like it was bread dough.

This is what it looked like in the bowl once I was done mixing it. Nice & smooth, all of the flour was mixed in, and it easily came off of the sides of the bowl.

Spreading it into the foiled pan was interesting, since the foil wanted to go with the dough wherever it went. This meant that I couldn't just use a spoon to mush the crust around since the foil would follow. I eventually discovered that I could use my hand as a sort of rolling pin, and slowly push the dough out to the edges of the dish.


Yes, the crust has fingerprints in it. Whole handprints, actually. What? I washed my hands! It's getting covered up with yumminesss! No one is going to see the handprints!


No, really, it's fine. 

 For maximum cooling in the shortest amount of time, I put the baked shortbread crust on a wire rack in the coldest room in the house. I didn't want the cheesecake mixture to start cooking on a hot bed of baked cookie beforetime. 


I didn't wait too long, either. The casserole dish was cool enough to hold with my bare hands when I started putting on all of my layers. Here we're layering on the apples.
 Now, this is the caramel sauce that I made using the recipe up top. I made a couple of mistakes here; first of all, the butter wasn't warmed up enough to start with, and secondly I stirred it too much.This means that the fats in the butter separated, and I was left with a grainy, lumpy mess instead of caramel sauce. There are ways to save separated caramel, but this sauce refused to be saved.

Yes my friends, it looked like a hot mess. Ooooh, but it tasted delicious. And did you see that streusel topping? NO ONE IS GOING TO KNOW. 

That's right.

I put it on anyway. Excelsior!


The finished product. Ooey. Gooey. Warm. Delicious. I can't tell if it's breakfast or dessert. I don't care. You want to eat this. You really do.